Intro
WireGuard is pretty cool.
I was looking over my home internet router following a recent ISP change and saw that there was a new release from Ubiquiti for the old EdgeRouter SFP-X router that I have been using for years. It was sitting on version 2.0 for several years and they have just pushed a major new version 3.0. These are great little router/firewalls that do a bit of everything and with this new version, other than a GUI upgrade, they have added native support for WireGuard VPNs (wireguard.com).
I had not used WireGuard VPNs previously and saw that it has gaining a lot of support, particularly in the open source arena. So I thought I would get this working with my laptop to have secure remote access to my home network when away. But when I went looking for the documentation on how to setup the EdgeRouter with a client I couldn’t find a good guide. So here is a rough solution to show how easy it is to get going.
Layout
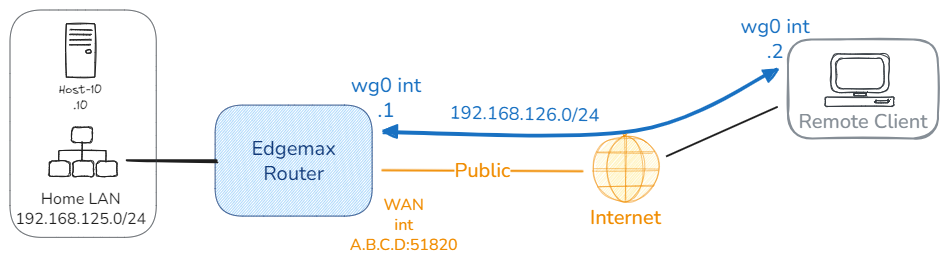
So I always find it easiest to visualise with a diagram. So here is what I am looking at:
 Wireguard-Client Drawing 2026-01-30 14.48.28.excalidraw
The Remote Client is on some Public Wifi, 5G or remote network connected to the Internet and I want a secure connection back to a Host on the Home LAN network, 192.168.125.0/24, so I can ssh or rdp to my server. I have a static ip A.B.C.D at home.
The blue line represents the VPN tunnel between two virtual interfaces that WireGuard builds at either end of the tunnel.
The great thing about setting up virtual interfaces is that they can participate in other networking activities, for example routing protocols, firewall zones and policies.
In this example I have setup a point to point network 192.168.126.0/24 with the EdgeRouter at .1 and the remote client .2. From the remote client I need to be able to route to the 192.168.125.0/24 network.
WireGuard Configuration
There is a good overview of how WireGuard works on their website wireguard.com but other than setting up a virtual interface on the peer, it uses public and private cryptography to create the tunnel and secure the connection. Keys are generated for both ends of the vpn tunnel and these are stored at either end in a configuration file that the WireGuard service uses to configure the tunnel(s).
Summary of the Steps:
Here is a summary of the steps for those that just want to get stuck in:
- Login to EdgeRouter with version 3.0 of the OS and Enable WireGuard in VPN options.
- Configure ip Address and Subnet mask for tunnel interface of the EdgeRouter.
- Configure the Remote Client under the Peer, give the Peer a name and hit the Generate button.
- Define the Remote client ip as AllowedIP and download the Peer Configuration File and hit Save.
- Open the downloaded config text file and add additional parameters for the Remote Client Peer config:
- Interface ip address —
Address = <ip address/subnet> - EdgeRouter public ip address and port —
Endpoint = <Public ip of Edge Router>:<port configured for Wireguard> - Networks to route down the tunnel —
AllowedIPs = <Tunnel Network, LAN Network>
- Interface ip address —
- Install WireGuard client software on device (laptop, phone, tablet) and load in the saved configuration file above.
- Hit Activate and you should be good to go.
- Update the firewall policies for the new EdgeRouter wg0 interface if you want to manage access from the remote client.
- Enjoy.
Below is a little more detail on the configuration and further notes with a couple of gotchas.
Configuration for Head End - EdgeRouter.
As of version 3.0 of Ubiquiti’s firmware Wireguard is automatically added to the VPN options in the new improved EdgeRouter GUI.
- Login into your version 3.0 EdgeRouter and select the newly relocated VPN icon on the left hand side toolbar, select the WireGuard button:
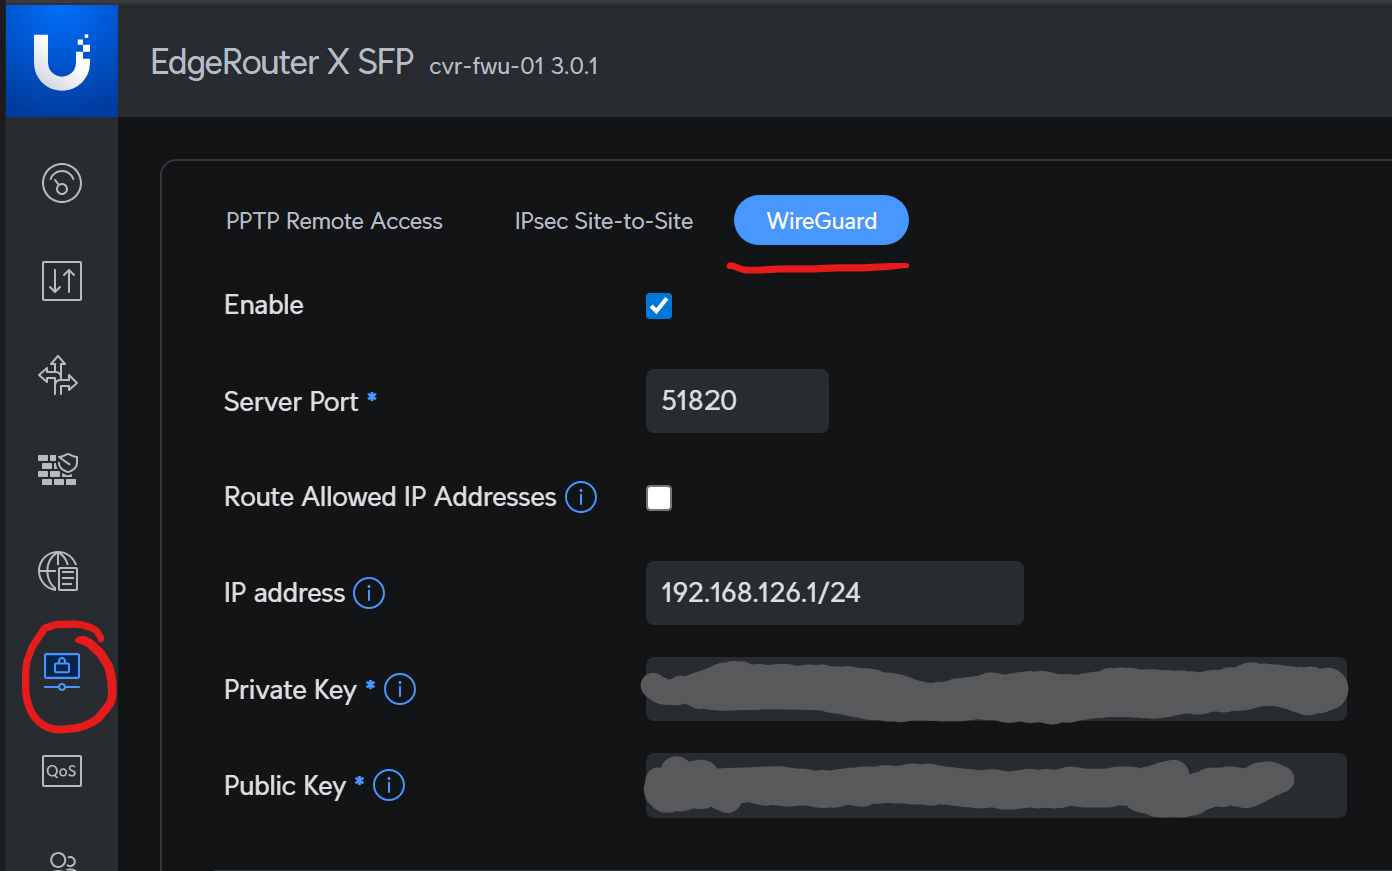
- Click Enable, the Router will turn on the WireGuard service. The first thing it does is automatically generate new public and private keys for you.
The Server Private and Public Keys are not editable fields. If you want to change them you must do this from the CLI.
Once you have enabled and created your keys DON’T disable/re-enable the service. The GUI Portal will automatically generate new keys and any existing configured peers will no longer be able to connect.
Save a copy of the server keys just incase, and backup your configuration. You can reinstate the old keys via the CLI if you accidentally regenerate them.
-
In the IP Address field, add the ip address and subnet mask for the virtual interface you want to use for the point to point tunnel with the remote peer/client. From our diagram this is the wg0 EdgeRouter end with address 192.168.126.1/24
-
Then hit Save.
Peer config on the EdgeRouter
The next task is to create the peer configuration for your client or remote end device. (Peer)
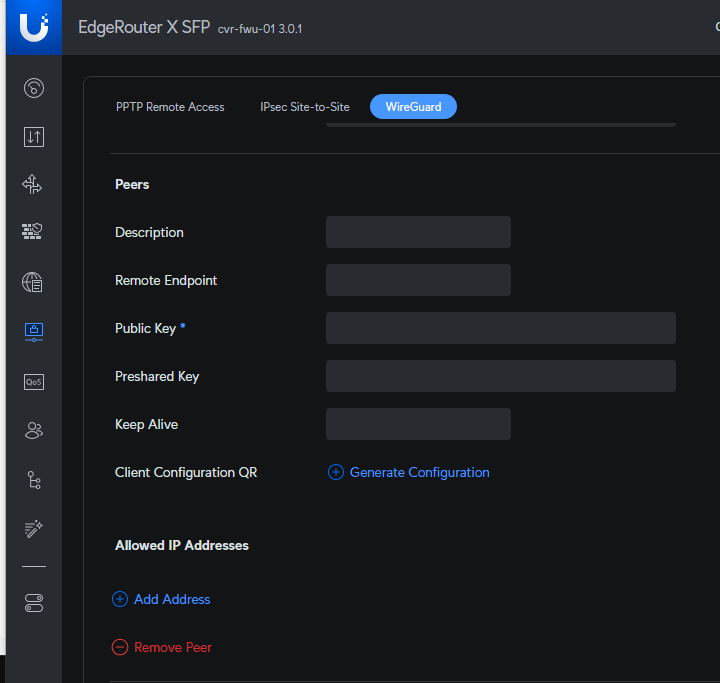
- Add as suitable Description of the remote peer, then click the Generate Configuration link.
This again, will generate a set of random keys for the Peer to use and presents you with a Download link containing a text file with the necessary keys. There is also a QR code — which you can use on the variety of devices like iPhone and Android which have WireGuard Apps and a camera.
-
Download a copy of the Peer config - The download option is not visible once you save and move off this page.

-
Under Allowed IP Addresses, hit the Add Address and input the address and subnet mask of the ip address you want to use for your Remote Client tunnel interface. I will use 192.168.126.2/24 in this case.
This ip address / subnet also represents the address(es) that the EdgeRouter will stick in the routing table. This is the traffic that should be routed down the wg0 virtual interface and tunnel TO the Peer (Remote Client).
-
DO NOT add a value to the Remote Endpoint field — This is for point-2-point links, not an option for a phone or laptop that uses a dynamic ip.
-
Hit Save, the EdgeRouter will set up the wg0 interface and start the WireGuard daemon.
-
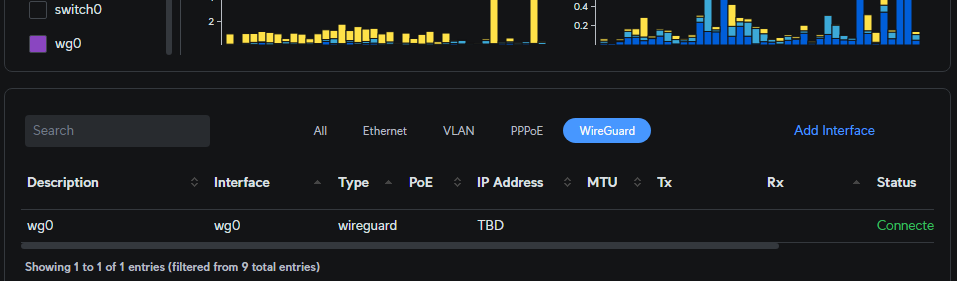
Go back to the EdgeRouter Dashboard in the lefthand toolbar and check to see that the wg0 tunnel interface is up.
That is all that needs to be done initially on the EdgeRouter, we need to now configure the Remote Client end of the tunnel.
Configuration for Remote Client End - Laptop
This could apply to any OS that has the WireGuard app available for it, in this case the app is installed on a Windows 11 laptop.
- Download the Wireguard app from their website, wireguard.com/install/, and install it.
- Starting the app creates a new virtual interface but the WireGuard app is really basic, and the only way to configure a tunnel is by importing or creating a new config file from scratch.
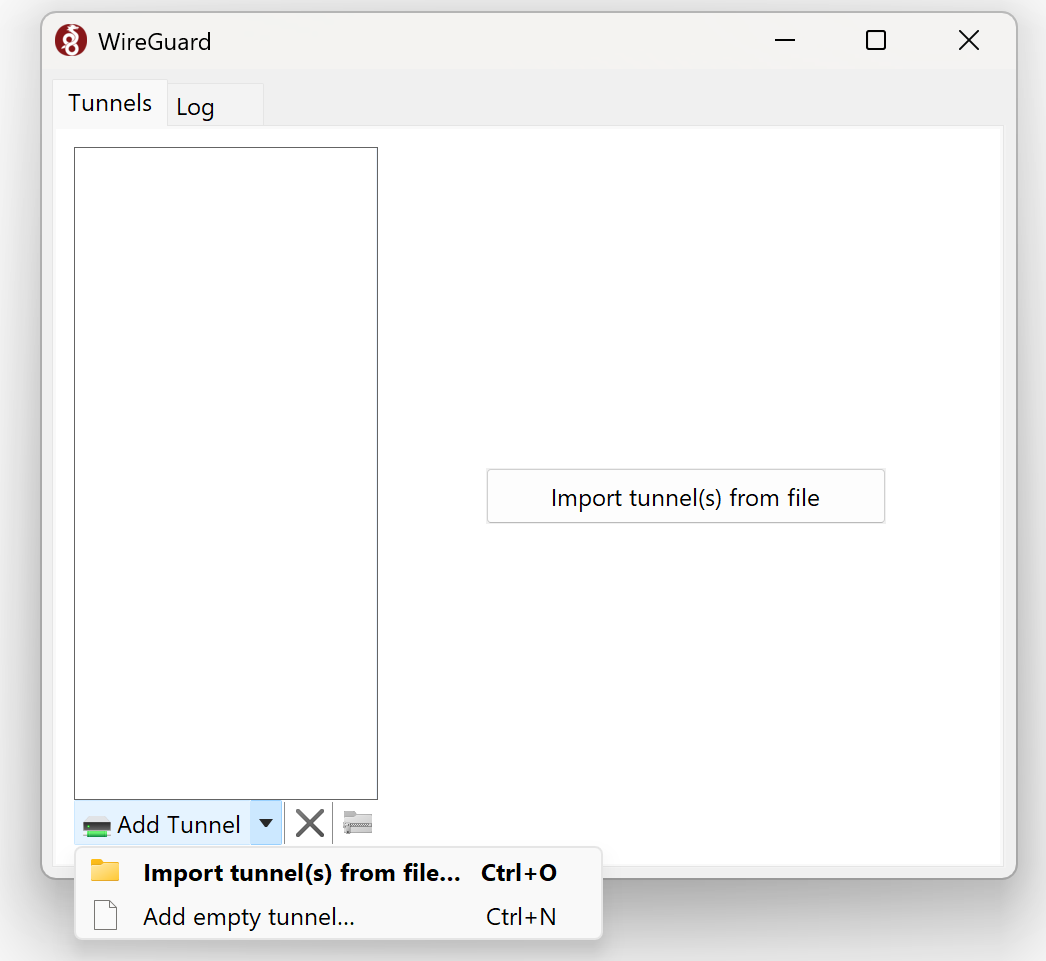
- Take a copy of the configuration file you saved above and transfer it to the laptop. This file has copies of the necessary keys to build the config that the client needs.
- Import the file into WireGuard on the Remote Client:

- The configuration file saved from the EdgeRouter has the most basic of information:
[Interface]
PrivateKey = gGAyB/Q4Ataal1Qd <SNIP>
[Peer]
PublicKey = b/Sih84zeDf6Adqj <SNIP>
PresharedKey = 11+U1w6AymdAt/Ygr <SNIP>
There are several parameters that are missing from the QR code and Downloaded config text file that are required to fully define this tunnel and the traffic to route down the tunnel. This is where Ubiquiti documentation stopped and have to go back to the WireGuard documentation.
- In order to setup the tunnel the following information needs to be added to the configuration:
| Description | Section | Variable | Example Values |
|---|---|---|---|
| The Remote Client’s tunnel interface ip address and subnet mask | [Interface] | Address | 192.168.126.2/24 |
| DNS to use to look up the Endpoint URL (Optional) | [Interface] | DNS | 1.1.1.1 |
| The public ip address or URL and port number for the EdgeRouter at home. This should match the configured port in the EdgeRouter config | [Peer] | Endpoint | wvpn.test.co.nz:51820 or A.B.C.D:51820 |
| The ip addresses and networks that are going to be routed over the tunnel. This will include the tunnel network and the LAN network(s) | [Peer] | AllowedIPs | 192.168.126.0/24, 192.168.125.0/24 |
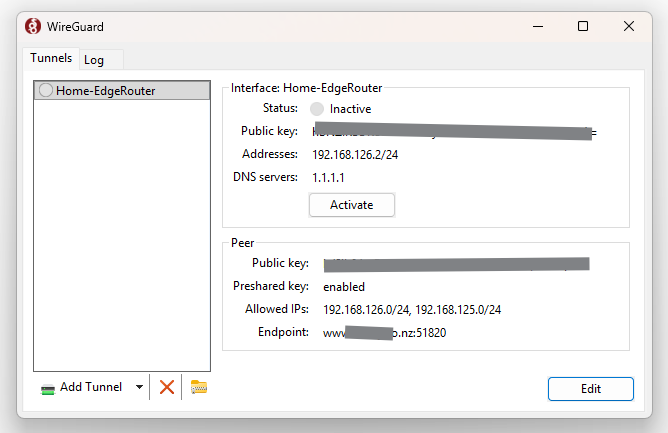
You can either add the details to the generated config file and reimport the config file, or you can hit the Edit button and add the additional Variables directly to the existing config, and give it a friendly name.

- Hit Save and it should be ready to go, The App will display the details and the state of the tunnel with an Activate/Deactivate button for the connection.
Test and Monitoring the connection.
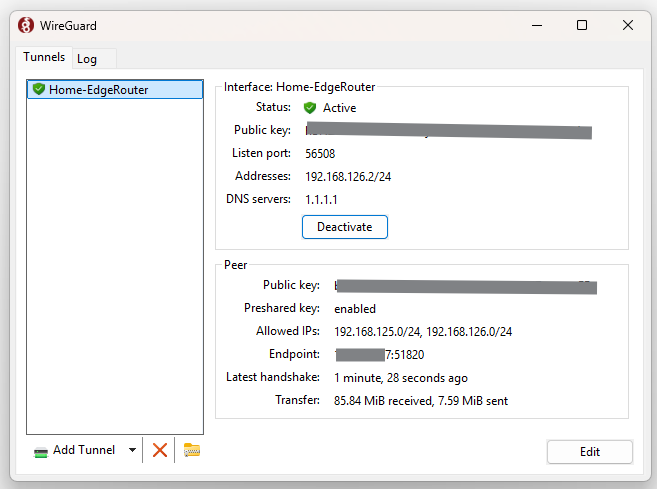
- Activate the Tunnel, and if everything is setup correctly you should get the green shield.
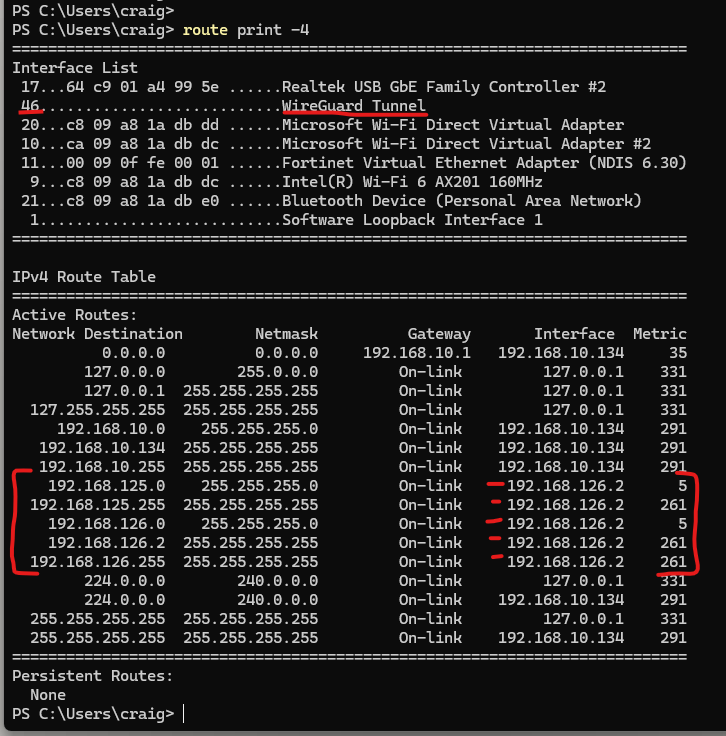
- Check the interface settings:
PS C:\Users\craig> ipconfig /all

Windows IP Configuration

   Host Name . . . . . . . . . . . . : CVR_Yoga

<SNIP>

Unknown adapter Home-EdgeRouter:

   Connection-specific DNS Suffix  . :
   Description . . . . . . . . . . . : WireGuard Tunnel
   Physical Address. . . . . . . . . :
   DHCP Enabled. . . . . . . . . . . : No
   Autoconfiguration Enabled . . . . : Yes
   IPv4 Address. . . . . . . . . . . : 192.168.126.2(Preferred)
   Subnet Mask . . . . . . . . . . . : 255.255.255.0
   Default Gateway . . . . . . . . . :
   DNS Servers . . . . . . . . . . . : 1.1.1.1
   NetBIOS over Tcpip. . . . . . . . : Enabled
-
and routing table on the laptop:
-
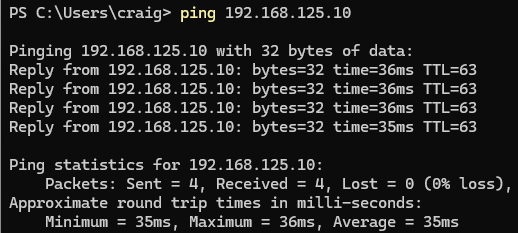
Ping the Server at the LAN over the tunnel (Testing at a remote location):
-
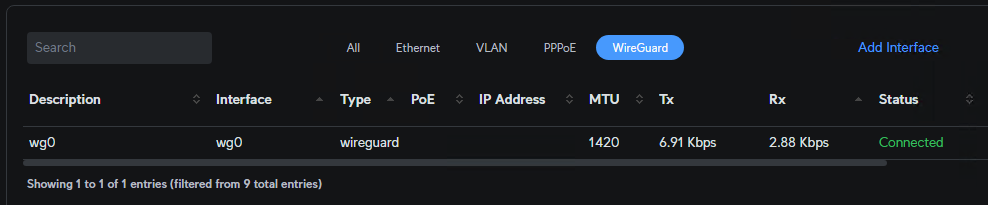
Back on the EdgeRouter at the head end you should see traffic coming through on the Dashboard:
-
Time to also go and add a firewall policy to protect the wg0 interface for the inbound connections, but that is not in scope for this discussion.
Now that the tunnel is up it just will route from your remote client on 192.168.126.2 through the tunnel to 192.168.126.1 and route across to the server .10 on the LAN 192.168.125.0/24
If you leave the Wireguard app running it will automatically reconnect without any user input due to the key peer cryptography.
Setup of a phone or other device is very similar and for a bonus if you want to route all traffic via your home Internet connection - to pick up your local Netflix service when overseas, just add the default route to the AllowedIP and it will tunnel everything via your Home trusted and secure gateway.
There are a bunch of cool things and features that WireGuard gives you but this will get you up running.